Welcome to Confidence, Handstand Factory’s 10 Day Handstand Course. Through coaching thousands of people, the biggest concerns we hear from absolute beginners are:
“What if I fall?”
“I don’t feel strong enough to hold myself upside down…”
“This looks like it might hurt my wrists.”

What do all of these beginners have in common? They lack CONFIDENCE in their own abilities.

And that’s not their fault! There’s a presupposition in the handbalancing world that if you want to handstand, you’re ready to “just send it”. But we know this is not the case.

So if you’ve found yourself in this same situation, you’ve come to the right place!

Learning to handstand is, quite literally, learning to stand again. It not only demands attention and coordination, but also specific strength from limbs that haven’t evolved for this task in the same way your legs have. So it’s going to be exhausting and messy – which quite frankly is scary.

You will fall. But we can take that from frightening to no big deal. Throughout the next 10 days we will provide you strength exercises to temper your joints, techniques to buffer those landing forces, and stretches to keep you limber. This combination of strength, coordination, and mobility is the key to feeling confident in getting on your hands!

Daily Training Information

In addition to written theory, each day of this handstand confidence course will include a short, 15-20 minute training session that incorporates the theme of the day.

We recognize everyone will come into this program with different levels of comfort being upside down on their hands.  You may have just gotten used to being inverted in a wall handstand.  Or wall handstands might be a cakewalk, but freestanding still brings feelings of anxiety.  To accommodate this wide range the best we can in this format, the daily programming will sometimes include optional, more challenging drills or allow you to pick between two drills.

Feel free to play with the more advanced drills, but make sure you’re able to perform the task safely first. You have lifetime access to this course, so if you’re hesitant to try an exercise on the day, skip it.  We encourage you to run the program multiple times, working up towards the advanced drills as you build the strength and coordination to confidently attempt them.

Here’s what you can expect for each day this next week:

  1. Read the theory. Each day will start with some writing addressing common challenges, our unique strategies, or in-depth details related to the day’s training.
  2. Complete the training routine for the day.  Following the written material, we’ll apply the principles practically through this short daily training session.  

And here’s what you’ll need:

  • An empty wall with space on either side.
  • Flat, level, firm ground. Thick carpet is no good.
  • Space to cartwheel and roll.
  • A dowel or stick.  Even a broom handle will work.
  • A knee-height stool.

Also, here’s some notes on the training itself.   The routines for each day use nomenclature common in strength training.  We have noted some of the more technical terms if you are unfamiliar with them here:

The HSF programs often pair and superset exercises. When looking at the exercise order, follow it alphabetically. For exercises with letters followed by a number, you do one set per number – going sequentially through the subset. But you will complete all assigned sets before moving to the next letter.
For example, a program might list:

A – 1 Set | B1 – 2 Sets | B2 – 2 Sets | C – 1 Set

So if you look at your training day in terms of sets, it would look like:

Set 1 = A | Set 2 = B1 | Set 3 = B2 | Set 4 = B1 | Set 5 = B2 | Set 6 = C

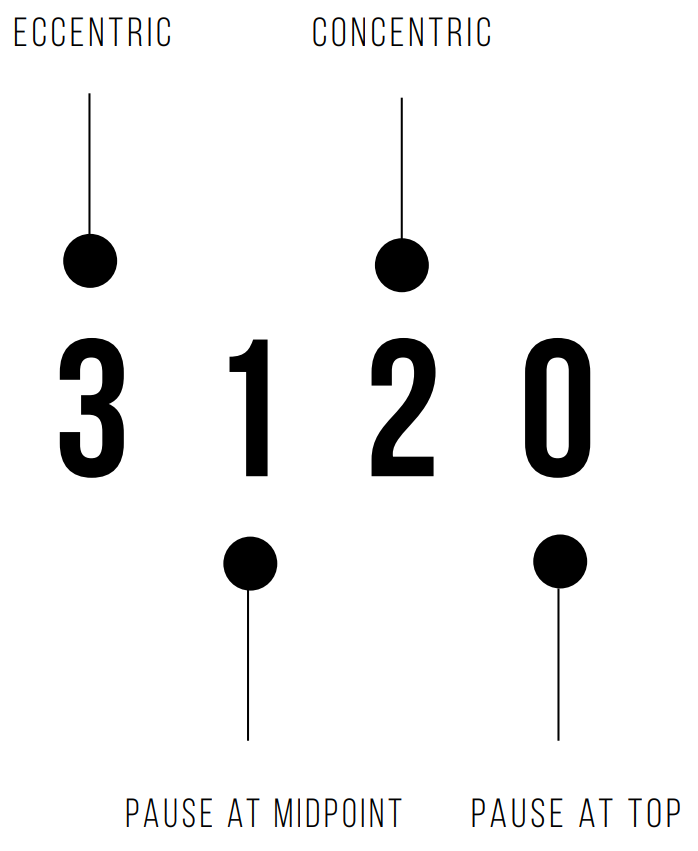
Many exercises in the HSF programs use tempo to determine the speed of a repetition. Each rep has 4 phases:

The above graphic is how tempo is notated. One repetition at this tempo would consist of a 3-second eccentric (muscle lengthening phase) with a 1-second pause at the midpoint, followed by a 2-second concentric (muscle contracting phase) and no pause at the top before starting the next rep.

RIR stands for Reps In Reserve. This is a subjective perception of how many ‘reps in the tank’ you have at the end of the prescribed rep count.

For example, if an exercise has 10 reps with an RIR of 12, when you complete your 10 reps you should feel like you have the ability to complete just 2 more.

DIR stands for Duration In Reserve. It is similar in concept to RIR, but unique to Emmet’s M3 system of flexibility training. When doing an isometric hold, the DIR is your perceived ability to keep holding the position beyond the prescribed time.

For example, if an exercise has you holding a 45 second isometric with a DIR of 10 seconds, you would theoretically only be able to hold that shape for 55 seconds in total before failure.

Day 1

Without further ado, let’s start your training for Day 1.  The purpose of today’s training is to first sense how the grip with the fingers can easily move the body in crow stand. Once this is clear we try to apply the same concept in handstand. It is a lot harder in handstand so it might take some time to get a feeling of it. The closer your handstand is to the wall, the easier it will be to feel the engagement of the fingers. Even if you do not manage to pull yourself from the wall with the fingers in handstand, keep a strong intent on doing so.

  • A: Crow Rebalance Drill
    • 10 – 20 reps, looking for a clear feeling of finger engagement. Rest as needed between reps.
    • 2 min rest after
  • B: Scapular Push to Standing Pike
    • 1 set
    • 15 – 20 reps
    • 2 min rest
  • C (optional): Back-to-Wall Handstand
    • Only attempt if you feel you can execute this safely with control
    • Look for a clear feeling of finger engagement, even if you do not pull your heels off the wall
    • 5-10 total attempts. Rest as needed between attempts.
Crow Rebalance Drill

Key Details:

  • Easy way to experience finger control.
  • Twist your hands slightly outwards so you can place your knees on your elbows.
  • Put your knees on top of your elbows and lean forwards into balance; do not jump.
  • Push yourself off balance on purpose and back to the floor.

Description:
The crow rebalance drill will not develop your handstand much in itself, but it can give you the sensation of how the hands and fingers function in a handstand. The sensation of balancing a crow stand is the same as a handstand, but it is simpler and requires less force because your centre of mass is lower.

This drill allows you to discover how finger pressure moves your center of mass: pressing too much pushes you out of balance.

Scapular Push to Standing Pike

Key Details:

  • Always focus on pushing straight down into the ground.
  • Keep arms straight and weight in the middle of the hand.
  • Look at the floor through the entire movement and push through traps when you reach the top of the motion.

Description:

This exercise is a great way to sense how scapula articulation is key to finding the shoulder position you want and how your trapezius muscles stack your shoulders over your hands as you move your hips upwards. The idea here is to trust the shoulders to move yourself up, though you are still applying some pressure with your toes to allow for yourself to lift the hips. As you reach the top position, make sure you feel that your traps are working. You want to keep the weight in the middle of the palms at all times.

If you feel you need to lean a lot forwards or bend your arms during this movement, it is likely that you will need to do some work on your shoulder mobility. If you feel a strong stretch in the hamstrings while performing this exercise, you can bend your knees slightly or place your hands further forwards. Work with what you have and develop your pike and/or shoulder flexibility separately with the exercises in this program.

Back-to-Wall Handstand

Key Details:

  • Strong engaged traps and shoulders during the kick-up⁠
  • Kick-up is controlled to lightly touch the wall (this will come with practice)⁠
  • Hands, shoulders, and hips stacked in a line⁠
  • Legs in a “Y” to balance each other out and minimize arching⁠
  • Steady press with the fingers to separate from the wall and balance⁠

Description:
This exercise tends to get a bit of a bad rep, as people can easily arch their back and fall into less efficient form.⁠

If done with the correct intent and setup though – with shoulders and hips placed properly – it is incredibly useful to teach us how to use our fingers in the handstand.⁠
⁠⁠
The end goal of this drill is to kick-up with so much control that your heel doesn’t actually touch the wall at all, but just hovers right next to it.⁠

As one gets stronger and more comfortable with that, as well as more comfortable with bailing out of a handstand, then moving on to more freestanding work becomes much easier!⁠